|
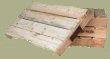
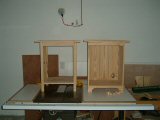
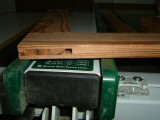
This project was a fundamental design change from the first table. I opted for a solid piece of furniture for this table. I also choose not to hand plane the boards for this project, because I was gluing up panels I wanted more consistency. Instead of a hand plane I used a OPT. A OPT is "Other Persons Tool." My friend Dave has a planer and a jointer, so I went to his house and we were able to plane 8 pallets in no time. So I am starting off with a stack of planed lumber and an idea. The first step was gluing up panels. This picture shows the panels after glue up, here is a layout of all the panels. |
 Click picture for larger image |
|
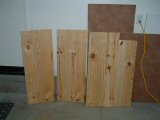
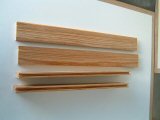
I want to re-iterate that when
you are working with pallets the
material is not "free." There is a significant cost in time. The
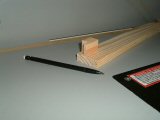
pallets seem to rebel against all attempts to work them into straight
material. Most of the boards bowed as they dried. If you look at the
picture on the left you can see the severity of the bowing. I did find
a way to use these boards in my next project.
|
 Click picture for larger image |
|
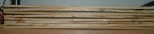
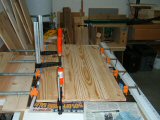
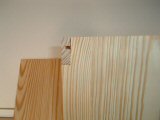
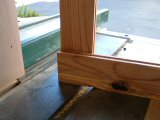
In an effort to use up some of the less than perfect material, I sometimes glue bowed boards to straight boards. I have no idea what this will to the piece in the long run, but it works for now. The picture on the right shows a warped board being coerced into a straight panel. The clamps with the red handles are holding the seam of the glue joint. Essentially I am clamping the board straight. After the glue up this panel held its shape. We shall see what happens over time. |
 Click picture for larger image |
|
Even with my persuasion each
panel that I glue up needs quite a bit of work. I have found a paint
scrapper with a carbide blade to be an essential tool. Initially I use
the paint scraper to knock off the yellow glue. It also does a good job
of taking the high points off the seams. Once I have smoothed the seams
down somewhat I move on to the belt sander. I use 80 grit belts in the
sander. My main objective is to flatten out the joints. It takes a
little work to do this with out plowing out a groove. Make no mistake
the boards are rarely smooth. My goal is to make them visually smooth.
When you run your hand over the panel there is no hiding the defects.
This would not be an issue if you bought kiln dried wood, but what fun
is that? I would like to point out that I save the flattest boards for
the table tops.
I think that these imperfections play into my design. This is not high end furniture, I intend for it to have a rustic feel. Consistency is also important to me, I don't want one part of the project to stand out above all others. |
 Click picture for larger image |
|
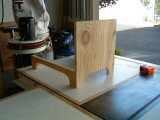
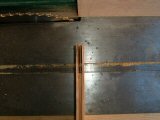
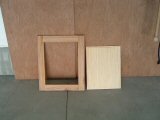
At this point of the project I have glued up all of my panels. I used some cut off pieces to make templates and to test cuts and proportions. If you click on the picture to the right it will show 3 views of my first test cuts. I wanted to confident of the shape of the curve, and to decide how I wanted to assemble the carcass. I tossed out the idea of a face frame, so I opted to notch the side panels to accept the front skirt/rail? To cut the curve I measured out 2 1/8" from the out side of the panel. I made a mark, and then used a jar to trace the curve. I measured up 2 1/8" and connected the 2. Then I cut the curve out with my Uncles jig saw. (Borrowed Tool!) The back panel sits in 1/4" rabbets, So I compensated for this when I measured my curves for the back panel. I only measured in 1 7/8" I measured and cut the side panels before I made the notch to accept front skirt. I also used a round over bit in my router table to ease the inside diameter of the bottom. The front skirt was ultimately attached with nails. |
 Click picture for larger image |
|
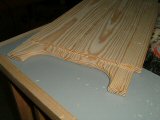
After I notched the side panels
to accept the top and boot rails I cut a dado for the deck and a rabbet
for the back panel. I made sure to do this at the same time for both
sides. Once I set the depth, it only made sense to make all my cuts.
This picture show the eased interior radius a little better. I lined
the dado for the deck with the top of the notch for the lower rail.
Close inspection of the picture will show that I did not spend a lot of
time trying to clean up the inside of this panel. Its quite wavy. If
you click on the picture to the right you can see how I cut the rabbet.
Very straight forward, set the fence and run it through. Prior to any
cuts on my project stock I made test cuts.
|
 Click picture for larger image |
|
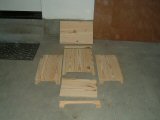
Here is a layout of all of the parts for the carcass. You can see all of the notches, rabbets and dadoes from here. You might notice that there is a large knot on the back panel. I included that on purpose. I thought that if I ever needed to put a corded item on the inside there is a nice place to slip the cord through. |
 Click picture for larger image |
|
I wanted to use wooden clips to
attach the top. The idea is to cut a dado around the inside to accept
the lip of the clip, then you drill through the bulk of the clip into
the top. I made the clips with the radial arm saw. First I cut dadoes
through the stock to make the clips, then I ripped the stock in half,
finally I cut the blocks off. If you look at the pictures on the right
I think its self explanatory. If you started with a narrow board you
could forgo the ripping operation. Now with that said this the first of
a series of setbacks for me on this project. I would not recommend that
you try to use pine for these clips. I found it has a nasty tendency to
split.
|
 Click picture for larger
image
|
|
Here is my first setback. I was very careful to measure where the clips would mount on the top front rail (pictured) sides and back. After the clips were cut I made my measurements and I send the top rail, side panels and back panel through the router to make a dado. This small dado is designed to accept the clips. |
 Click picture for larger
image
|
|
Doh! Yes that word and this picture say it all. I had the right idea. I ran the dado through all of the other parts, and it was concealed. My design exposed the end of the top rail, I should have made a stop dado. Luckily making a new front rail only took a minute. I ended up dropping the piece down on the router table to make the stop dado. You can see the end result when you click on the picture on the right. I had one more blunder in the "make your own clip" department. The clips were mad out of pine, and they wanted to split even when I pre-drilled holes. I ended up making new clips out of birch. |
 Click picture for larger
image
|
|
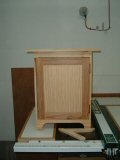
All of the components are complete, so the carcass was ready for assembly. I made all of the connections with glue and nails. I put my testing piece in the photo so you could see where I used rabbets and dadoes. If you look carefully you can see that the top curls down. After the top was glued it began to curl on one side. I thought the curl would be less noticeable going down. I was disappointed because now the "good" side of the top had to face down. I am learning that you need to be very adaptable to changes in your plans when working with pallets. |
 Click picture for larger
image
|
|
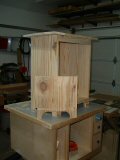
Here is a side by side of version 1 and version 2 of the pallet table. The first table is a copy of a table in my house. I have made several of these tables already, and I wanted to do something a little bit different. I plan on adding a door to the table, but as you can tell I have exactly copied the dimensions of the first table. You might also notice a large knot hole in the back panel. I included that on purpose, just in case something with a cord ends up inside the table. Once I added the door that seemed less likely to happen, but you never know. |
 Click picture for larger
image
|
|
I had very high aspirations for
my door, I planed on a raised panel with mitered corners and bead
detail on the inside. As I considered my options I ended up tossing
most of those ideas. My main obstacle was the thickness of my stock. I
started with ¾ " rough stock. Once the stock was cleaned up it
was only slightly more than ½" thick. It made it implausible to
raise the panel or get tricky with the rails and stiles. So I went for
simplicity. For the panel I used five thin pieces of stock to get a
very straight grain. For the rails and stiles I had just enough reddish
pine to frame the panel. I started by cutting the stock allowing
for through tenons. Essentially I cut two pieces the width of my
opening
and two pieces the height of my opening. Next I cut a ¼" grove
down the center of all of these pieces. I used my table saw to make the
cut. I set the height of the cut at a ¼" and set the blade a
¼" from the fence. Next I ran the stock through on one side and
then flipped it over and ran it through on the other side. This gave me
a perfectly centered groove. I used a chisel to clean out any remaining
stock.
|
 Click picture for larger
image
|
|
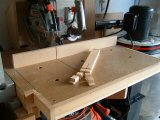
I planned on using through tenons for my joints on the face frame. This picture illustrates how I set about laying out the mortise. The skilled and observant among you will recognize my mistake. I laid out the height of my mortise on the outside of the stock. The inside of the groove is where I should have laid out the cut. If I did not explain this very well hang on I have pictures coming up. If you click on the picture to the right it will show a series of three pictures, including a hastily made tenoning jig that used to make my cuts. Technically I used the tenoning jig to cut the mortises. I made the tenons on the router table. I raised a ½" straight cutting bit a ¼" above the table, and set my fence for the length of the tenon. I milled out the stock on one side, flipped it over milled the other side and I had my tenon. |
 Click picture for larger
image
|
|
This picture shows the outcome of the mortise on the table saw. When I ran the stock though I clamped the workpiece to the jig. The last set of photos shows the jig and the workpiece without clamps, that was for photographic clarity only. The photographic clarity is another way of saying after I did all my cuts I remembered to take a picture, and it was faster without clamping it down. |
 Click picture for larger
image
|
|
This picture clearly illustrates my measurement glitch. This was not very difficult to overcome though. I used a hand saw to cut four plugs that I used on the end of the doors. If you click on the picture to the right you can see the before and after. |
 Click picture for larger
image
|
|
Here is a photo of the frame and panel for the door. I used four thin boards to make up the panel. I cut the straight grain from four different boards to give it a quarter sawn look. The panel has a tongue cut all the way around it. It slips into the frame and if flush on the front and back of the frame. |
 Click picture for larger
image
|
|
Here is a picture of the table without any finish. I decided to try shellac on this piece. I bought some shellac from a local hardware store, and I was quite pleased with the result. The shellac had an amber tint that gave the piece and instant vintage look. |
 Click picture for larger
image
|
|
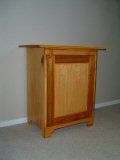
Here is the final product. (minus a knob, have not picked that out yet). I put 3 coats of shellac on, sanding between each coat with 220 grit sandpaper. When you click on the larger picture you can see the arch on the table top. This happened as the top dried. I have also added a latch to keep the door close. The latch is piece of wood that I drilled a hole in, screwed into the top and plugged the hole. I rounded all the edges of the latch with sandpaper. Please let me know if you enjoyed this project, or if you think I left out important information. Thanks! Mark |
 Click picture for larger
image
|