|
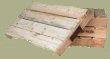
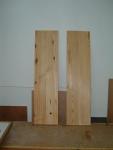
Waste not want not is the theme for this project. The pallets I used to build my other projects yielded unused 4" x 4" 's. I also had a fair amount of warped boards that were not usable. This table is my way of addressing those issues. I managed to use up four of the 4" x 4" 's on the legs and the top is made up of warped boards doubled up on each other. Like this.  Each board was glued to cancel out
the warp of the other. I used eight boards to make the top.
|
 Click picture for larger image |
|
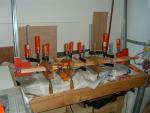
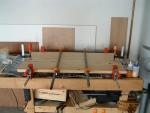
This photo shows how to glue 2 boards together on the faces. You need a lot of clamps to get a good fit. This was also my first project to use Gorilla Glue. The cleanup with the Gorilla Glue is definitely easier than yellow glue, but the jury is still out. I had some glue failures on small cut off pieces. I am not sure if this was a clamping issue or error on application. I will wait and see if the top opens up in the future. |
 Click picture for larger image |
|
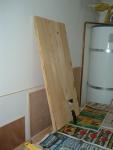
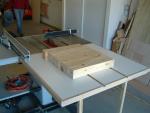
This picture depicts eight boards glued up. Four boards go into each "half". I ran these glue ups through the planer to get a perfect seam. Once I glue them all up I will need to clean up the top by hand. The final board is wider than my planer. |
 Click picture for larger image |
|
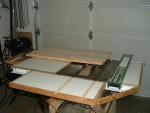
The two panels in the last
caption were not perfectly flat. Even a few trips though the planer
could not fix this problem. The planer will make stock a uniform
thickness, it does almost nothing to flatten warped boards.. To combat
the
warping I used small clamps to hold the seams flat on the ends. On
these boards both ends had nail holes, so they were destined to be
trimmed off. This meant I did not have to worry about the clamps
marring the workpiece.
|
 Click picture for larger image |
|
Here is the panel after the final glue up. I used a paint scraper and a belt sander to flatten the final seam. I was fairly fortunate with this top. I only had a 1/16" of deviation on the seam. I attribute this to the planer getting a even thickness on the last two panels before final glue up |
 Click picture for larger image |
|
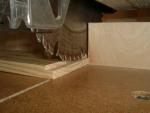
The finished panel was cut down to size with my homemade panel cutter. The panel cutter is a scrap of MDF that has a runner attached to the bottom. The runner rides in the miter gauge. A cleat at the back of the MDF is perpendicular to the blade. |
 Click picture for larger image |
|
I had the best intentions for cutting the tapers on the legs with a handsaw. Sometimes I feel like I want to use hand tools and get to some woodworking roots. Well I did cut one leg with the handsaw, and quite frankly, my skills were sadly lacking. I failed to achieve the smooth seamless taper of my minds eye. This leg became a test leg for my mortises. |
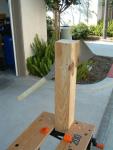 Click picture for larger image |
|
Now I had it in my mind to use a band saw to cut the legs out after my less than stellar attempt with the hand saw. So I packed my stock up and went to Dave's house. Dave has a very nice band saw that was calling out to me. |
 Click picture for larger
image
|
|
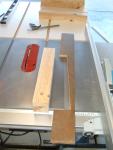
When I arrived Dave talked me into using the table saw to make the cuts. Lacking a taper jig we grabbed a piece of scrap plywood and whipped one up with the band saw. I marked the taper on the stock. A line where I wanted it to start 5" from the top, and 2" width on the bottom. I set the stock on the plywood, lining the two marks up on the edge, traced the shape out and then cut it. |
 Click picture for larger
image
|
|
It took me some time to figure out how important sanding is to the finished project. Keep in mind that is not fine furniture, and it is meant to have character, but I have learned that saw marks telegraph themselves through a finish. It can make nice piece look, so so. At this point I take the time to use some 80grit paper to knock out the saw marks, Next I move to 100grit, then 150grit. At this point I stop. I will start with 220grit before the finish is applied, but I wait until I am done working with the wood. |
 Click picture for larger
image
|
|
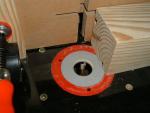
I made the mortises in the legs with my router table. I set the height of the bit and set up a stop on the fence. Once setup I just pushed the legs through to the stop. The top of the mortise won't show and it is very quick. One more tip, match your mortise width to the size of your router bit. Don't try to adjust the size with two cuts. I tried that in the past and it is more trouble than it's worth. |
 Click picture for larger
image
|
|
Next I made the tenon for the mortise. I took another shortcut here. I used a rabbet instead of a tenon. I used my radial arm saw to make the rabbets. This worked out well for me because I was able to set the saw height once, and I had a dedicated tool. This allowed me to make adjustments on the router table and the radial arm saw at the same time. Once everything was dialed in I was ready to go. |
 Click picture for larger
image
|
|
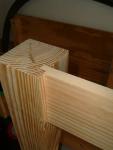
My mortise technique requires a notch on the bottom of the stretcher. To layout the notch I slipped the stretcher into the mortise upside down. I marked the cut, and then I trimmed it off with a hand saw. |
 Click picture for larger
image
|
|
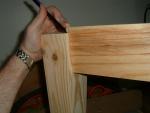
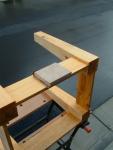
Here is the final fit of the stretcher. It slips into the mortise, a little glue will hold it with no problems at all. |
 Click picture for larger
image
|
|
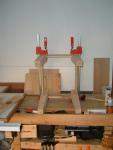
Here is the final glue up for the base. This is probably the easiest project that I have done to date. Once I decided how to put it together it only took an hour to make all of the cuts. |
 Click picture for larger
image
|
|
I finished the table with shellac. I used 220 grit sandpaper on the project for the first coat. On subsequent coats I used 320 grit sandpaper, with a MDF block. I stopped using a palm sander after the first coat. I put four coats on the project. |
 Click picture for larger
image
|
|
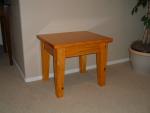
The finished product! I attached the top with figure eight fasteners. I use a forstner bit to bore out a place for the fasteners on the legs, then I drill pilot holes in the legs. Next I attach all of the fasteners. Then you put the table top upside down and set the base into position. Line up the base and then screw it to the top through the exposed portion of the figure eight fasteners. Make sure that your screws for the top are the correct length. You do not want a screw to pop through your freshly finished top. |
Click picture for larger
image
|