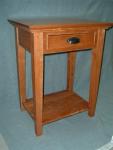
Cherry Side Table
Introduction
 This project is a replica of a friends table. The
original table came from Restoration
Hardware. It seemed like a great project to build. I had a lot of
fun building it, and I learned a thing or two. Most importantly I had a
great time building the table.
This project is a replica of a friends table. The
original table came from Restoration
Hardware. It seemed like a great project to build. I had a lot of
fun building it, and I learned a thing or two. Most importantly I had a
great time building the table.A parts list is available with and basic assembly diagram for the table. The project is mostly 4/4 cherry, however I used 12/4 cherry for the legs. If the 12/4 cherry is not readily available, you could glue up blanks. In retrospect I would not use 12/4 again. The cost is more than double 4/4 stock and there tended to be a poor selection at my lumber store. Since this project I have made similar projects with 12/4 requirements. I glued 4/4 and 8/4 stock together to achieve 12/4 stock. This was cheaper, produce less waste and it did not make a noticeable difference in the final project. The whole project is about 16.5 board feet. At my lumber yard this easily sails past $100 in material. You will probably spend about $150 total to finish the project. The drawer pulls are available directly from Restoration Hardware. I am tying to provide very specific step by step instructions on this project. Please let me know if you need more information, or if you think I am leaving something out.
Legs
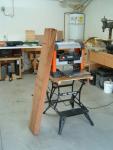
The legs of this project required a substantial amount of effort. 12/4 stock, or a glued up bland of 8/4 and 4/4 is necessary to get a 2 1/4" leg. I used 12/4 which came rough sawn. Unfortunately all the 12/4 stock I found had substantial cups and twists. Removing those geometric imperfections demanded a fair amount of coercing. I started the cleanup with my portable planer. The planer removed the cups, but did nothing for the twisted areas. I decided it might be better to cut the stock to length and then clean up the smaller pieces with my friends jointer.
When it comes to squaring up stock a planer
is no substitute for a jointer. Cutting the stock
to a final length reduced the effort in squaring up the stock. Squaring
the
shorter pieces required less work. In no time at all I had
blanks that were 2 1/4" square by 29 1/2" long. Carefully evaluate
lumber closely at the time of purchase. If you don't have access to
a jointer, don't buy twisted stock. If you cant find good 12/4 stock
remember it is also possible to glue up 4/4
and 8/4 stock to make the legs.
Once the legs blanks were
complete I made a jig
to create the taper I wanted. The taper for the
leg starts 5" from the top, and end at the bottom of the leg with 1
1/4"
of material left. I marked the starting and stopping points of this
taper on the leg. Then I set the blank on a scrap of plywood and lined
the marks up on the edges of the plywood. The first mark 5" from the
top just touched the edge of the plywood. The second mark on the bottom
of the leg also touched the bottom edge. This left 1 1/4" of the leg
"inside" the plywood and 1" of overhang. I traced this profile on the
plywood then I cut it out with a jigsaw. This became my taper jig. Two
passes for each leg and I had all four legs tapered.
This picture at the right shows a sanded set of legs compared to an unfinished set.

Tip: After I finished sanding one side I wrote the next grit on the leg in pencil. This helped me keep track of my sanding progress.
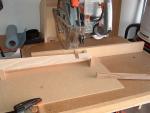
Each leg of the finished table has a notch to accept the lower shelf. The top of the shelf is 3" from from the bottom of the leg. So the notches start 3" from the bottom of the leg and are inset 1/2" from the sides. They the same thickness as the shelf. I used a three step process to complete the notches. For step one I used a radial arm saw to remove the bulk of the material. A simple jig made by gluing four MDF triangles on a piece of hard board held the leg for the radial arm saw. The stick on the right side of the photo was used to verify the thickness for the cut. It was a scrap cut from the lower shelf. Once it fit snugly I was ready to move on to the next step.
Step two involved the drill press and a forstner bit. The radial arm saw did excellent job of establishing the sides of the notch, however quite a bit of material remained. The forstner bit removed the bulk of the remaining material. If you do not have a radial arm saw, this would be the place to start. A hand saw can define you initial edges.

Step three requires a chisel. Clean out any remaining material and square the edges. Take your time and go slowly, most importantly keep your chisel sharp! A sharp edge speeds up the work and the accuracy. Removing small amounts of material is easier and more precise than removing large chunks.
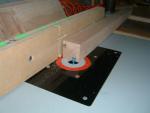
I used sliding dovetails for the joints on the table. This photo shows the cut for the legs. Cutting the legs required adjusting the fence twice. Each setup should allow for a 1/8" setback of the rail from the edge of the leg.
Tip: Make sure that your dovetail bit is snug. A loose bit will try to walk up the workpiece.
Here are the finished legs. It is hard to see in the photo but each leg is numbered. Before I made any cuts I laid out the legs, and marked the location of all of the dovetails. I spent to much time prepping the legs to ruin one because of a simple mistake.
Skirts
- Dovetails
- Next I cut the side skirts. Until I made the dovetails in the legs I did not know the length of the skirts. Once I measured the depth of the dovetail, I doubled it and added it to the skirt. The next step is to take a piece of scrap and make a few trial cuts to set the fence. Run each side of the scrap through till you have a snug fit. Now you can cut your work piece. It is probably a good idea to do all 4 skirts once you have this setup correctly.
- Drawer Front
- I cut the drawer front for this project directly from the front skirt. I made a jig to facilitate the cuts. The jig held the front skirt in place on some scraps of plywood. I added another scrap to act as a fence for my hand held circular saw, the fence allows a cut 5/8 from the edge of the top. I placed my circular saw on the jig and plunged it into the workpiece. (make sure the bottom of the jig is not on a table, the blade comes through) the jig cuts 90% of the long sides of the drawer with the circular saw. Use a jig saw to finish the cuts. There should be about a 5/16" gap all the way around the drawer. This gap gives you room to use the jig saw. Ultimately 1/4" beading fills in most of that gap. Once you have cut out the drawer front it need to be trimmed to size. If you click on the photo to the right you can see a series of photos that illustrate this.
- Beading
- Once you have the drawer cut out you can add the beading to the inside of the drawer. I made the beading out of scraps from the project. The beading is 1" wide and a 1/4" thick. I used a beading bit to round over the edges in one pass, although you should be able to use a 1/8" round over bit with 2 passes to get the same effect. I cut to the beads to size and mitered them with my miter saw. I fastened them with a combination of brads and glue.
